Table of contents:
1. What is secure boot?
2. How to find out, is the security boot function active on your computer
3. How to disable secure boot
- HP motherboards and laptops
- Dell motherboards and laptops
- Asus motherboards and laptops
- Acer motherboards and laptops
- Gigabyte motherboards
What is secure boot?
It is a mistake to assume that Secure Boot is an option that belongs to the Windows operating system. This function refers to the UEFI – BIOS analog. Windows only uses this function to further protect your computer from unwanted third-party actions – hacking, spontaneous software launch or unlicensed applications. You can disable Secure Boot on any computer except for tablets that are running Windows 10.
How to find out, is the security boot function active on your computer
There are 3 main ways to determine whether the Secure Boot function is active on your PC:
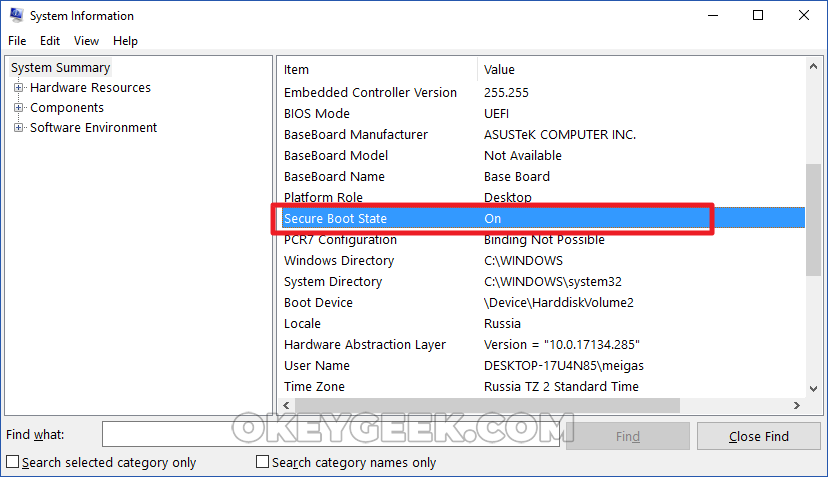
- The easiest way is to run the “Run” line by pressing Windows + R on the keyboard and enter the msinfo32 command in it. There will appear a window with information about the system where the “Secure Boot Status” column will indicate whether the Secure Boot function is enabled or disabled at the moment;
- Also, you can check whether the Secure Boot function is enabled on your computer through the Powershell. To do this, enter the appropriate query in the search and run the utility. Next, it requires that you enter the Confirm-SecureBootUEFI command. If this option is enabled, the message True will appear on the command line, if it is disabled, the message will say False. Any other message will indicate that the motherboard installed on your computer does not support the Secure Boot function;
- The most obvious way to find out if Secure Boot is active is to try an action that has limitations imposed by this option, for example, try to download Windows from a USB flash drive.
How to disable secure boot
To disable Secure Boot, you need to go to the UEFI settings (they are BIOS settings as well). There are two ways to do this:
- When you turn on your computer and before starting the operating system boot press the Del (or F2) key to go to the BIOS. It is worth noting that on some motherboards (often in laptops) it may be necessary to press several keys, for example, FN + F2, to go to BIOS. Most often the screen indicates which buttons you need to press to get there;
- If your computer is running Windows 8 or 8.1, you can reach a panel at the right part of the screen and through this panel go to the “Options”. Then select “Change computer settings”. Click “Update and Restore” – “Restore”, and then “Restart”, having configured additional parameters so that the restart should take place in the “Settings by UEFI”.
The second method should be used in situations where the keyboard does not work until the operating system is booted. Often this happens with wireless keyboards.
After you’ve got to UEFI, you need to act depending on which UEFI version is installed on your particular computer. Below we will tell you how to disable Secure Boot in the most common UEFI versions.
HP motherboards and laptops
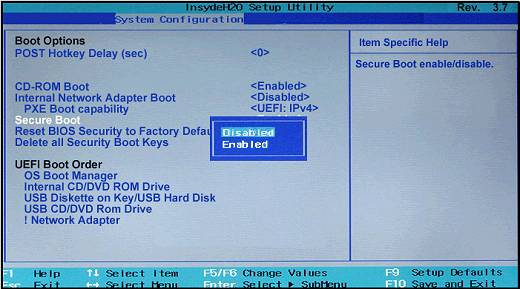
To disable Secure Boot on HP laptops, you need to go to BIOS. Then go to the “System Configuration” menu and select “Boot Options” from the list. Scroll through the list of actions until about the middle, where the option “Secure Boot” will be located. Click on it, and in the pop-up window, select Disable to deactivate the function.
Dell motherboards and laptops
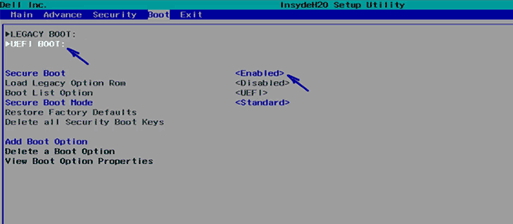
Dell provided a separate item specifically for setting Boot options in UEFI. To disable Secure Boot, you need to go to this section, select “UEFI Boot” and switch the “Secure Boot” option to Disable mode.
Asus motherboards and laptops
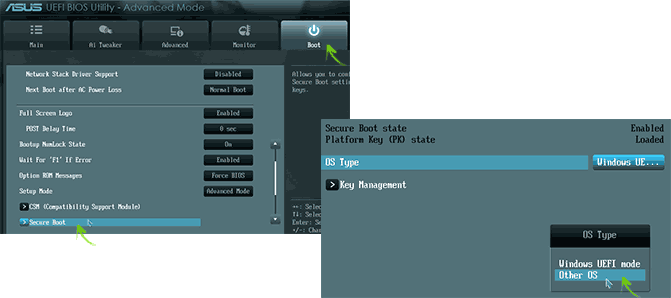
To disable Secure Boot on Asus devices, you need to go to the “Boot” tab in UEFI and select the “Secure Boot” option. Unlike many other BIOS versions, here it is required not to disable the function, but to set “Other OS” option in the “OS Type”.
Acer motherboards and laptops
Laptop. To disable the Secure Boot on the Acer laptop, go to the “Security” tab and select the “Set Supervisor Password” option. Next, you will need to come up with a password, after which additional options will become available, in particular, the ability to set the “Secure Boot” function to the Disable mode.
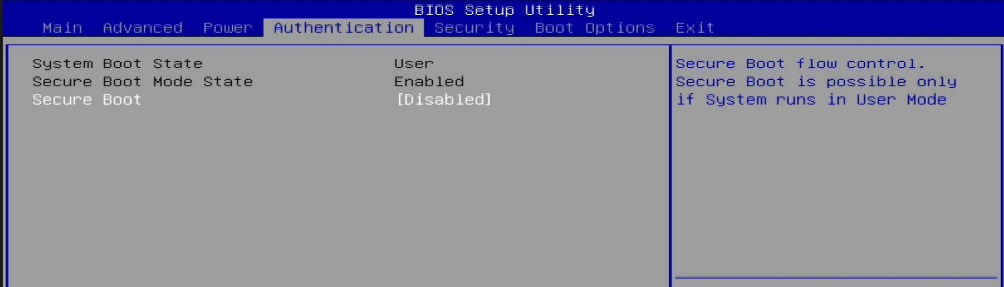
Motherboard. You can disable Secure Boot on the Acer motherboard in the “Authentication” section by selecting Disable for the corresponding option. If the motherboard is old, you should look for the option in the “Advanced” – “System Configuration” sections.
Gigabyte motherboards
The most modern UEFI version is presented in Gigabyte motherboards. To disable Secure Boot here you need to go to the “BIOS Features” tab and move the corresponding item to Disable.
On other motherboards and laptop models, the scheme for disabling Secure Boot is approximately the same. It is important to note that before you exit BIOS, be sure to save the options so that the changes you have made will not be reset.