Table of contents:
1. Rename you computer using system settings
2. Rename your computer using system properties
3. Rename your computer using windows powershell app
4. Rename your computer using command prompt
Rename you computer using system settings
The easiest way to rename your computer in Windows 10 is to use the standard “Settings” menu. Through this menu you can change the name of your PC in just a few clicks. To change the computer’s name through the standard system settings in Windows 10 you will need to:
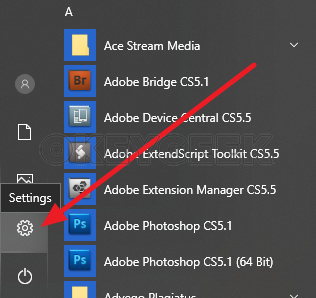
- Click “Start” with the left mouse button and go to the “Settings” menu.
- Next, select “System” to go to the main settings of your computer. Here you can turn off notifications, select the optimal power consumption mode and view the key parameters of your computer.
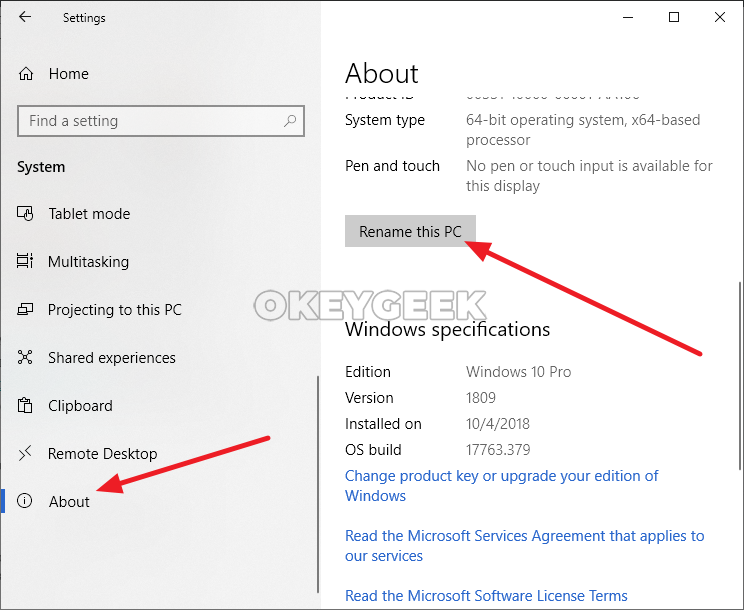
- Now in the left menu you need to click “About” tab. On the right there will be indicated the current name of this PC, as well as other information – the installed processor, the operating system capacity and so on. Next, click the “Rename this PC” button to open the corresponding menu.
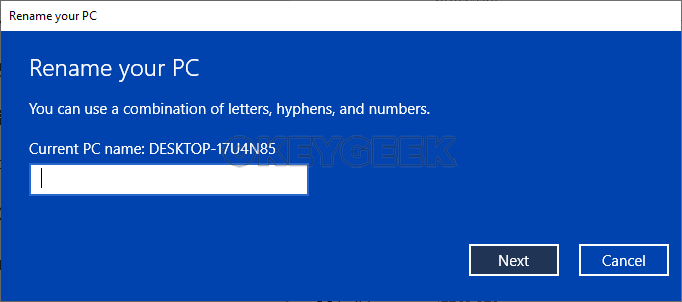
- Now write the new name that you would like to use for your computer. Please note: The name of your PC must be written in Latin letters, numbers or hyphens (other punctuation marks cannot be used). After selecting a new name, click “Next.”
- In the next window, the operating system will suggest that you reboot now so that the changes will take effect immediately, or later. After the reboot, your computer’s name will change to the new one.
This method is very visual, and if you need to explain to an ordinary user how to change the computer’s name in Windows 10 – you will probably not find a more convenient option.
Rename your computer using system properties
This method is more suitable for users who are accustomed to the standard Windows menu, and not to the updated Metro-Windows 10 design. This is what you need to do in order to change the name of your PC through the System Properties:
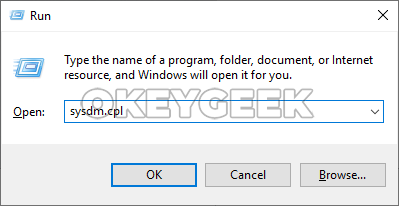
- Press the Windows + R keyboard shortcut in order to bring up the “Run” line. In this line write the sysdm.cpl command and press Enter to open the “System Properties” window.
- Next, in the “Computer description” column you must click “Change”.
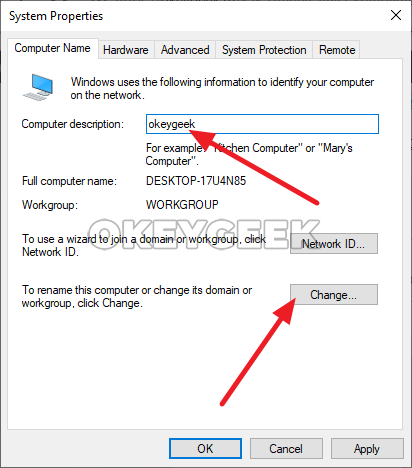
- Now you are going to see a menu where you can type in a new name for your computer, and then click “OK”.
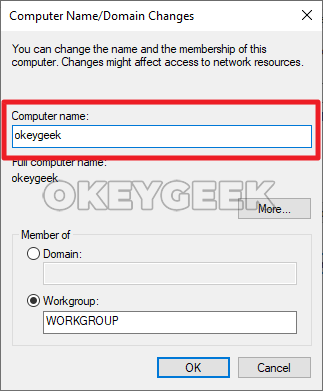
- Now you are going to see a warning message. It says that in order for the changes to take effect, you will need to restart your PC. This can be done immediately or postponed until later.
As you can see, changing your computer’s name in Windows 10 through the System Properties is no more difficult than through the “Options” menu.
Rename your computer using windows powershell app
Windows PowerShell application is less commonly used on the PC than the command prompt. However, it allows you to rename your computer in quite a simple manner:
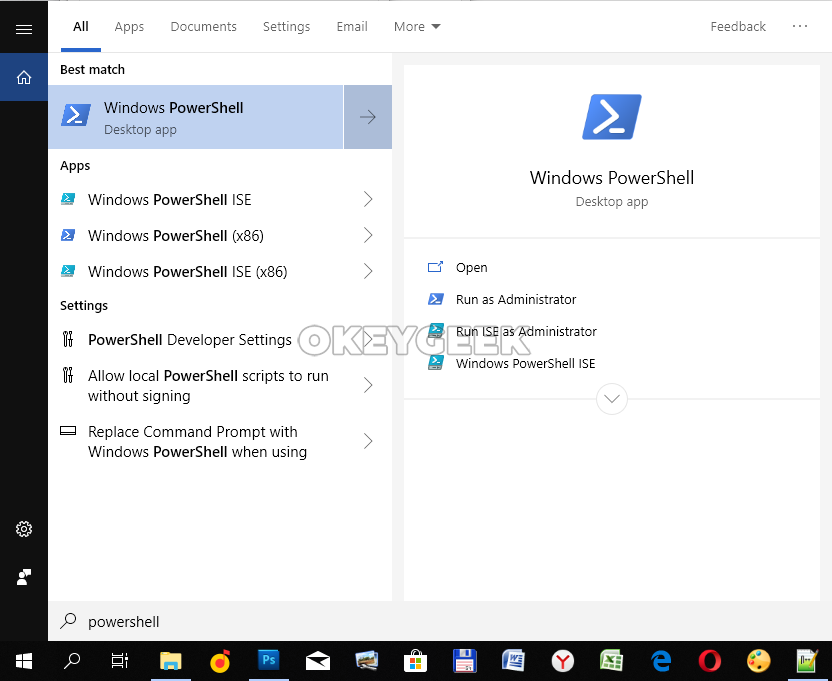
- In the lower left corner, click on the search icon and write the word “PowerShell”. Right-click on the application and select “Run as administrator”.
- Next, write the following command in the opened line: Rename-Computer -NewName OkeyGeek
Instead of OkeyGeek, select the new name for your computer.
Now you only have to restart Windows, and the changes will take effect.
Rename your computer using command prompt
Method that we are going to describe below is suitable for advanced users who know how to use Windows command prompt. Its advantage over the other methods is in the speed of execution. This is what you need to do in order to rename your PC via command prompt:
- Run Windows 10 command prompt as administrator.
- In the command window that opens, write the following:
wmic computersystem where name = "% COMPUTERNAME%" call rename name = "OkeyGeek"
New computer’s name is bold highlighted above, if you want to choose another name, type your name instead of “OkeyGeek” in Latin letters or numbers.
After that just restart Windows and your computer will be renamed.