Table of contents:
1. Power supply malfunction signs
2. How to test a power supply unit
- Step 1: voltage transmission check
- Step 2: how to test power supply unit with multimeter
- Step 3: how to check power supply unit visually
Power supply malfunction signs
There is no specific symptom that will indicate that out of all computer components it is the power unit that is out of order. There are several pretty distinctive events in your computer’s “behavior” that may indicate that power supply is not working as it should. It can be stated that the power supply does not work in the proper mode (or there is another problem) in case you notice the following “symptoms” in your computer:
When you press the power button, nothing happens, that is, there is no light, no sound indication and coolers do not start to rotate. Since the power supply is a component that supplies other elements with a constant voltage, it is very likely that it had failed or there are other problems with the transfer of power to the elements of your computer – breaks in the wires, unstable supply of AC voltage from the network; - Your computer does not always turn on at once. In such a situation, there could be a power supply failure, poor connection or a power button malfunction;
- Your computer is spontaneously shutting down while the operating system is booting. This may occur due to intermittent voltage transfer from power supply to the other components of your computer. Also, such a problem may indicate power supply overheating and forced shutdown.
The power supply unit is one of the most reliable computer components and it rarely becomes unusable. If the power supply fails, the reason would be in its poor quality or in the constant fluctuations of voltage across the electric network. In addition, the power supply may unit fail if an incorrect calculation was made when it had been selected for a particular computer configuration.
How to test a power supply unit
If your computer has one of the symptoms listed above, do not immediately blame the power supply. A malfunction may occur for many other reasons. To accurately verify that there are problems with the power supply component of the system, it is necessary to perform some diagnostics. There are 3 ways you can test the power supply of a computer by yourself.
Step 1: voltage transmission check
To make sure that the power supply is actually able to turn on, you need to perform the following test:
- Remove the side cover of your computer case to access the internal components.
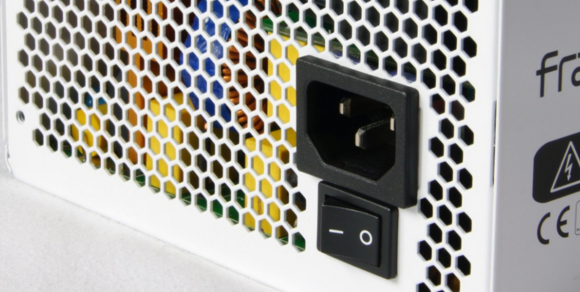
- Completely disconnect your computer from the electric network – we recommend not only pulling the power cable out of the outlet, but also pressing the power-off button on the power supply unit, setting it to “off” (0) position.
- Disconnect all computer components from the power supply – motherboard, hard drives, video card and others.
- Take a paper clip that can act as a jumper and close the contacts. It must be bent into a U-shape.
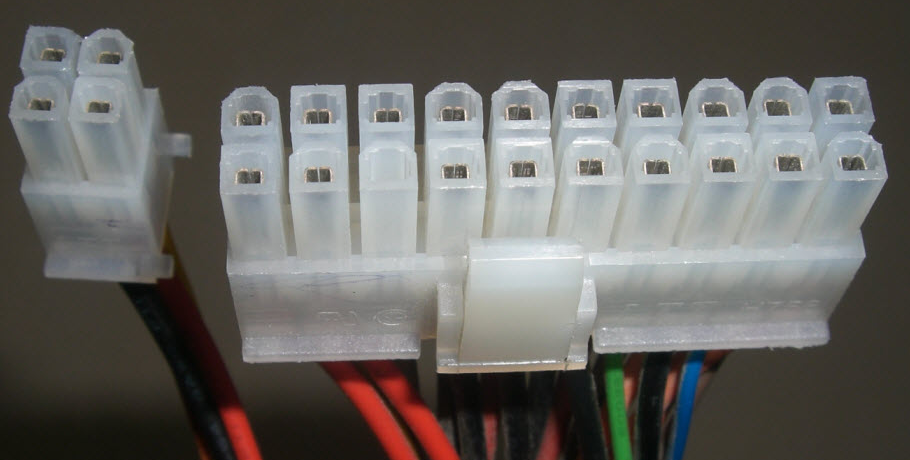
- Find the largest harness of wires with a 20 or 24-pin connector that comes from the power supply. These wires during normal computer operation are connected to the motherboard, and it is not difficult to determine them.
- On the connector, determine the two contacts, the closure of which for the power supply unit is a signal to connect to the motherboard. These contacts are very easy to find. They can be marked by the numbers 15 and 16 or they can be approached by the located side by side green and black wires from the power supply unit. Note that there can be several black wires on the connector, whereas the green one, most often, is the only one in this color.
- Insert the paper clip into the detected contacts to simulate connection to the motherboard for the power supply. Make sure that the paper clip is inserted tightly and that it is firmly pressing both contacts. If this is the case, release the paper clip (because voltage can go through it) and turn on the power supply of the computer (do not forget that it can be disconnected not only from the outlet, but also with its own off / on button).
- If you did everything correctly, the power supply cooler should start working when the voltage is coming from the outlet. It means that there is nothing wrong with turning on the power of your computer.
It should be noted that this check indicates the ability of the power supply unit to switch on. But even if the cooler of a power supply unit started to rotate, it yet does not mean that the device is completely flawless. Move to the next steps to verify the functionality of your power supply unit
Step 2: how to test power supply unit with multimeter
If you are convinced that the power supply unit is receiving voltage from the electric network and at the same time it is operating, it is necessary to check if it gives the required DC voltage. This is how you do it:
- Connect any external resistance device – drive, hard drive, coolers – to the power supply unit;
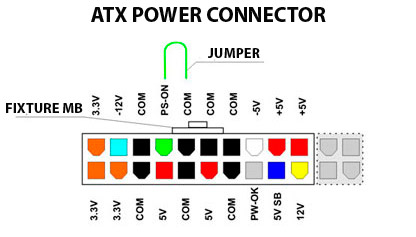
- Now take the multimeter set to measure the voltage, and connect the negative wire of the diagnostic tool to the black contact wire of the 20/24-pin power supply connector. With such a connection black contact will be considered grounding. Connect the positive wire of your multimeter to the pins of the connector with the following colored wires, and compare the numbers with the ideal voltage:
- Pink wire – voltage 3.3 V;
- Red wire – voltage 5 V;
- Yellow wire – voltage 12 V.
During the measurement, errors of ± 5% are permissible.
If the measured values differ from the ideal values, you can be sure that the power supply is malfunctioning and there is a need to replace it.
Step 3: how to check power supply unit visually
If you do not have a multimeter (or if additional diagnostics are required), it is possible to visually check your power supply unit for a malfunction. This is what you have to do:
- Disconnect your power supply unit from the computer case by unscrewing 4 (or 6) screws that are fastening it;
- Disassemble the power supply unit by unscrewing all screws that are on its case;
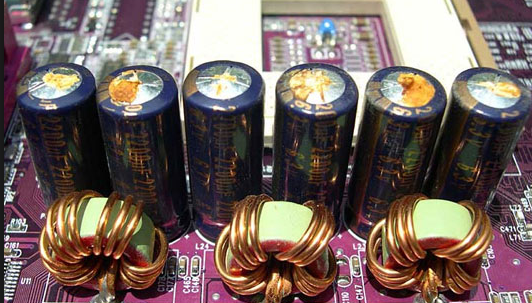
- Visually inspect the power supply chip. It is necessary to pay attention to the capacitors. If they are swollen, then most likely it is their failure that causes a breakdown of the power supply. In this situation (if desired), you can solder the capacitors, replacing them with similar ones.
In case you do not see any problems with capacitors, it is recommended to remove all dust from the power unit, lubricate the fan and assemble the device back, and then try connecting it again.